The need of an flexible app to evaluate algorithms with high performance
The base app was made in a few hours, after that has it been extended and improved, It’s built with Python, using Streamlit for UI, selected QuestDB for high performance database, uses stock data from Alpaca, Polygon and NewsAPI, able to run locally on a Mac (Apple Silicon) and as scalable server on Linux, (can also be deployed to Cloud) which is intended to be using (a prototype already exists, more of that later) multithreading to concurrently read stock data from a long list and pass it on to the FPGA that will process the data in around 300ns timeframe to locate stocks with the right strategy match and issue an order if risk management passes.
Cursor was used to generate code and test procedures, the generated code didn’t always work until a few rounds had been made to correct errors, one problem is that Cursor breaks the code quite often when a code change is introduced.
Deepseek-R1 is used to analyse stock news information based on the provided symbol collected from NewsAPI. The main use of the app is to work out a strategy that is intended be tailored for the unique platform and infrastructure in terms of performance/timings and
The AI part (Deepseek-r1:1.5b on MacBook Pro (M1/M2) on Linux server is 7b model currently being tested) is used excessively to analyse news information and report generation, it’s quite fast on the Mac (M1/M2), depending on the select stock symbol of course AAPL (Apple) for example will take much longer (currently 30s (M1)) due to the amount of data to analyse compared to a very small almost unknown company, a preprocessing step may be good idea to implement here, therefore it’s designed to be run in the background and the GPU performance will highly depend on the elapsed time
News Analysis by AI
News API (short)
Analysis
Risk Management
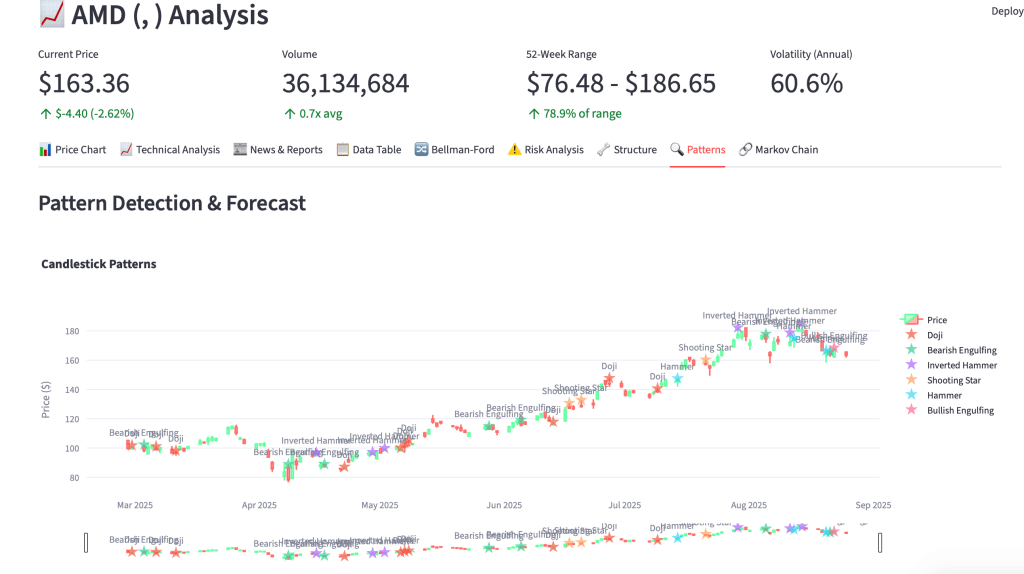
Patterns
Future ahead
(no AI was used to write this text)
Coming up: Real-time data against FPGA to stress analytics and latency/timings
The need of an flexible app to evaluate algorithms with high performance
The base app was made in a few hours, after that has it been extended and improved, It’s built with Python, using Streamlit for UI, selected QuestDB for high performance database, uses stock data from Alpaca, Polygon and NewsAPI, able to run locally on a Mac (Apple Silicon) and as scalable server on Linux, (can also be deployed to Cloud) which is intended to be using (a prototype already exists, more of that later) multithreading to concurrently read stock data from a long list and pass it on to the FPGA that will process the data in around 300ns timeframe to locate stocks with the right strategy match and issue an order if risk management passes.
Cursor was used to generate code and test procedures, the generated code didn’t always work until a few rounds had been made to correct errors, one problem is that Cursor breaks the code quite often when a code change is introduced.
Deepseek-R1 is used to analyse stock news information based on the provided symbol collected from NewsAPI. The main use of the app is to work out a strategy that is intended be tailored for the unique platform and infrastructure in terms of performance/timings and
The AI part (Deepseek-r1:1.5b on MacBook Pro (M1/M2) on Linux server is 7b model currently being tested) is used excessively to analyse news information and report generation, it’s quite fast on the Mac (M1/M2), depending on the select stock symbol of course AAPL (Apple) for example will take much longer (currently 30s (M1)) due to the amount of data to analyse compared to a very small almost unknown company, a preprocessing step may be good idea to implement here, therefore it’s designed to be run in the background and the GPU performance will highly depend on the elapsed time
News Analysis by AI
News API (short)
Analysis
Risk Management
Patterns
Future ahead
(no AI was used to write this text)
Coming up: Real-time data against FPGA to stress analytics and latency/timings
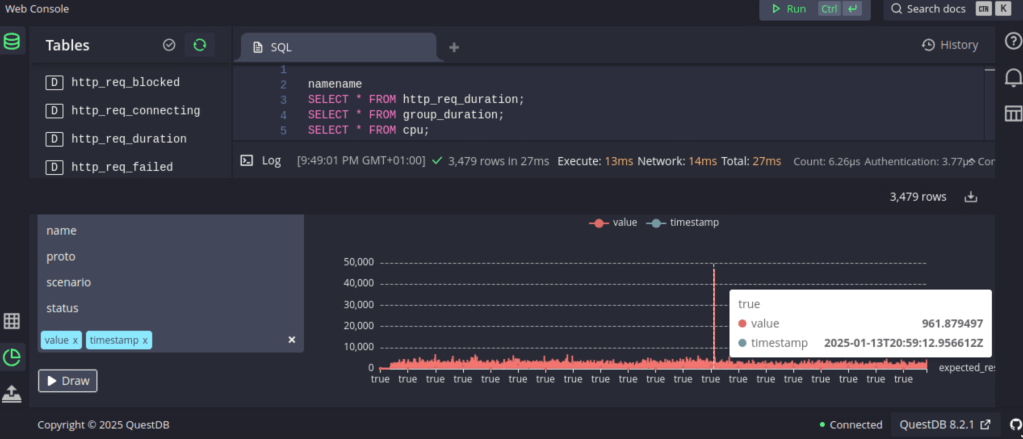
I’ve run into problems when loading performance data into Grafana with “another database” used to collect statistics for huge amounts of k6 performance test data with high cardinality, after a while, normally a few months, will the update of the Grafana dashboard become slow and take longer as time pass. I’m forced to create a new bucket to write to, start from scratch more or less, if needed
I happened to run into QuestDB while working on a “personal sized HFT solution” , I needed a extremely fast database, easy to manage and potentially already have some available resources for this particular purpose, so while searching I found discussions regarding the best DB for this low latency industry, most suggested QuestDB, so I gave it a try
I decided to use a Ubuntu VM on a overclocked Ivy Bridge and fast SSD to reduce the physical limited HW resources, downloaded and extracted the file structure, with a simple command started the database for it’s main directory:
bin/questdb.sh start
Jumped to localhost:9000 to access the WebConsole, imported a few samples and tried some queries, loaded a benchmark, ran it a couple of time and examined the results.
Then I noticed that QuestDB has a influxDB interface, so I thought, what about k6?
I tried a few command line variations, got it working quite quick:
k6 run script.js –out influxdb=http://localhost:9000
Found the data in the tables section (up to the left), a tried a number of combinations using the “draw” function to view the k6 results directly in the WebConsole, then I thought “Grafana”, there’s an excellent link how to setup Grafana for QuestDB: https://questdb.com/docs/third-party-tools/grafana/
There’s also information on how to query the database and you’ll get started faster on a fast DB than you may have expected
Next step will be to take a backup of the old database and import into QuestDB to evaluate the old data access.
I was interested in exploring the RISC-V architecture and what possible use I could make of it.
Did a little research and when it looked like the FPGA path could be the best option for me, I collected available RISC-V FPGA cores data, few would fit one on the FPGA’s I have, then I also found a project who had already done it.
So I implemented an existing RISC-V SoC on a Spartan-6 FPGA, a Pano Logic G2 board, using the LiteX VexRISC-V build environment and code, built using RISC-V cross compiler, connect the JTAG to the board flash the RISC-V to the FPGA and Linux to the NAND Flash.
Local storage is a tiny RAM (128MB), network is up and running and a serial console over DVI/VGA pins to a FT2232 (FTDI) serial (5V) to USB converter to manage the system when needed, this is enough to automate a boot, download at boot time or build in an application to be able to get online and start working.
It’s very fast, boots in a few seconds and connect to network, there is of course not so much space left on the flash to store any large application, but as a PoC it’s perfect and a larger board with faster FPGA and larger NAND, it will be even more useful as embedded system application platform.
pdp1145: ELF 32-bit LSB executable, UCB RISC-V, version 1 (SYSV), statically linked, with debug_info, not stripped
The test program (PDP1145) is transferred to the Linux by a wget to a FTP server.
Then I compare code from Intel platform and notice the execution time on an Haswell 3.20 GHz did in .20s and the RISC-V on 125MHz FPGA did it in .23s, what is the reason? Is the Intel that slow uncached? Or is it an architectural difference? Neither, on Linux PC it’s the disk load into memory that takes most of the time, after this is done once, it’s in memory and cached, while on the FPGA Linux and the loaded binary sits in RAM and has no load time.
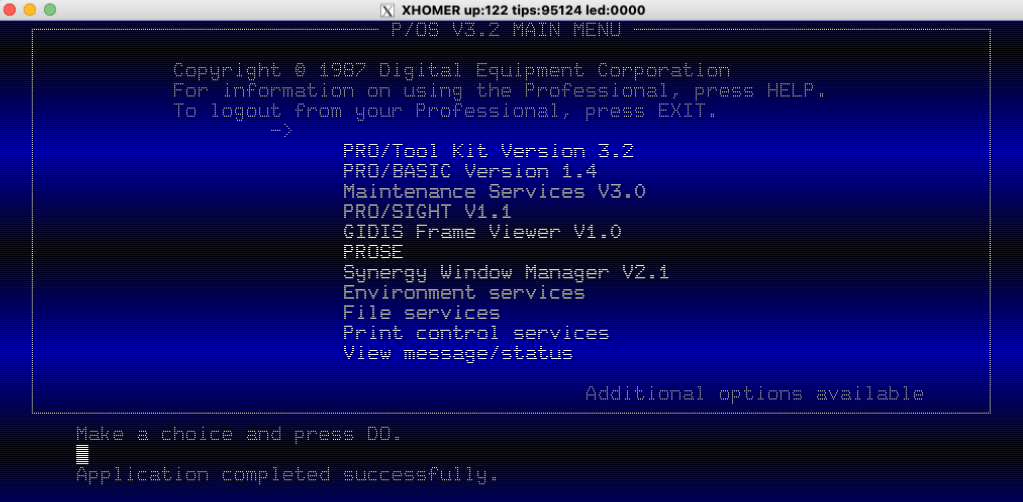
Power on FPGA and the RISC-V boot Linux
Requesting system reboot [13146537.373130] reboot: Restarting system
–========== Initialization ============– Ethernet init… Initializing SDRAM… SDRAM now under hardware control Memtest OK Memspeed Writes: 122Mbps Reads: 163Mbps
–============== Boot ==================– Booting from serial… Press Q or ESC to abort boot completely. sL5DdSMmkekro Timeout Loading Image from flash… Copying 5369452 bytes from 0x20440000 to 0x40000000… Loading rootfs.cpio from flash… Copying 4063744 bytes from 0x209c0000 to 0x40800000… Loading rv32.dtb from flash… Copying 2096 bytes from 0x20410000 to 0x41000000… Loading emulator.bin from flash… Copying 2992 bytes from 0x20414000 to 0x41100000… Executing booted program at 0x41100000
Again using the PDP1145 diagnostics as test case, enough complicated and used many times on various PoC’s to evaluate capability and performance, so let’s time the PDP1145 diagnostics.
A RISC-V model riscv32i_spartan6 is used for the Bare Metal SoC evaluation, the PDP1145 is compiled as a Bare Metal ELF image and loaded directly from USB/Serial (FTDI), as still in developer/prototype/test mode it provides a quick way to make change, compile and run.
The RISC-V SoC provides a UART that is mapped to I2C pins on the is used as console and debug output, while performing the functional testing
It’s time to unCloud and even unOS, real Bare Metal is trending!
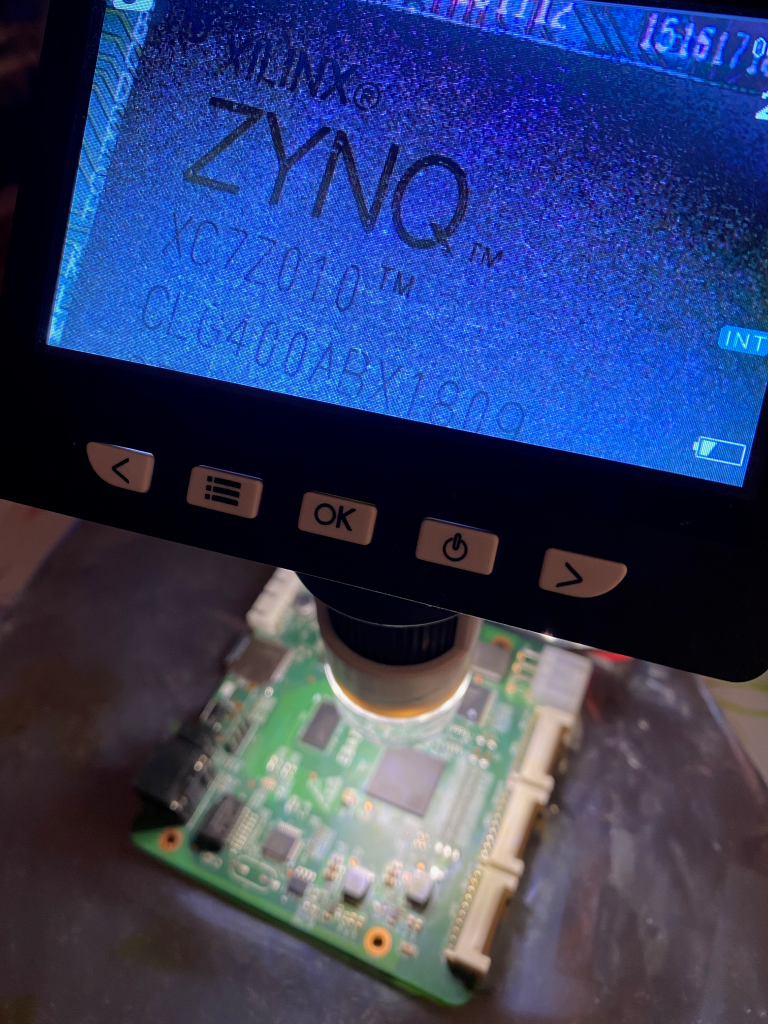
Implementing a legacy hardware emulator/simulator on Xilinx Zynq-7000 (xc7z010) SoC ARM/FPGA using HDL to build the HAL in the FPGA PL (Programming Logic) of the SoC while the emulator/simulator code runs in PS (Processing System) ARM core. Makes it not only quick and easily portable to other SoC/FPGA platforms, flexible to reconfigure the HAL and possible to select other board depending on memory and performance requirements and other potentially customised hardware using GPIO.
Using Libmetal, Newlib and some written in combination with Xilinx XIL-routines can all syscalls be replaced to use bare metal equivalents, it requires of course quite some programming efforts to get it running, but once a library and a wrapper has been built of all needed syscalls you can reuse them for other projects.
I/O access to serial lines, network and disk are done with Xilinx routines or equivalent if other FPGA vendor is used, handle system console via UART, network if needed and legacy disks can use SD Micro or OS disk can even be located in on-board Flash memory.
RTC clock requirement can also be provided by the FPGA and BSP clock.
Commercial legacy system emulators require often management and even replacement of the host system, host OS, clumsy reconfiguration when needed, hardly any benefits compared to the original, and disruption of target system when host needs updates to keep it secure and safe unless failover virtual environment is used to keep it running. While the legacy system normally stay untouched for long times without the need of constant attention and management, and access can also be less trouble some if serial communication is used.
Then you have the security perspective, how many levels of access surface exists in modern applications hosted on OS or Cloud? By using Bare Metal you have only what is defined by the target system or the libraries compiled into the target, nothing else.
The PoC required HW diagnostics to pass and then extensive testing of the target system and applications, the target a PDP-11 in this case, a VAX and Alpha also planned as PoC turns out to be successful.
The implemented can be used is various environments, maybe best suited for an embedded or strictly secure environments, but can also fit into a general application environment, standard hardware enclosure can be used to fit into rack or embedded in customised solutions. The solution does not require any management of host environment, since there is none, it is only target system running in its own environment, as the real legacy hardware.
As the legacy emulator/simulator runs on ARM core using existing code while the HAL of the HW target is located in FPGA solves the problem of having to tailor make the bare metal to specific hardware and eliminate the driver problem, this makes the solution quite portable and easy to migrate as well, as the system can be located and boot off a SD Micro can an equivalent system be setup, programmed and ready, then power down and power up in a few seconds the new system is up and running.
If you still need to use legacy hardware as VAX, Alpha, SPARC, HP-PA or SGI you can extend their lifetime by replacing fans, power supply and also storage like SCSI disks with SD Micro.
In many cases for development or non production systems it is not always justified and useful to use an expensive and/or slow emulator/simulator for daily work, as development and testing, for various reasons, but instead keep and use the original hardware makes sense, also as reference when the others fail to behave.
Some may argue that you can’t take it with you; you can leave it on, create port forward in your internet router and access the system remotely, via VPN.
These old systems are capable of a lifetime PC servers only can dream of, can you count how many times PC’s have been replaced while you used your Alpha from beginning?
I remember using Windows XP on a 133MHz PC at the same time I used a 233 MHz Alpha station, PC long gone while the same Alpha is still running OpenVMS.
Though some parts age more than others and can be replaced.
Fans can be replaced by newer more silent and effective fans, make sure the voltage and connectors match, also power supplies can be either refurbished by replacing capacitors and fans to extend life if not new matching replacements are found.
SCSI disks can be replaced by SCSI2SD boards where you can configure number of disks and size depending on size of SD Micro and then backup or copy the data from the real SCSI to the SCSI2SD devices and your system will run for another 20 to 30 years or so.
Adapter is extremely easy to install and configure, using USB, one can also preconfigure empty disk containers if free space exists, as many as the board supports, and you’re ready to go in case space is needed in the future.
On SRM console you will see the device as
In OpenVMS you will see the device as
If you need I/O performance and have a larger system capable of pushing lots of I/O, then you must use fastest supported SD Micro and maybe using more than one SCSI2SD board, same principle when splitting I/O in any other disk configuration.